Ombre Birthday Cake with Bows
Highlighted under: Creative Sweet Recipe Ideas
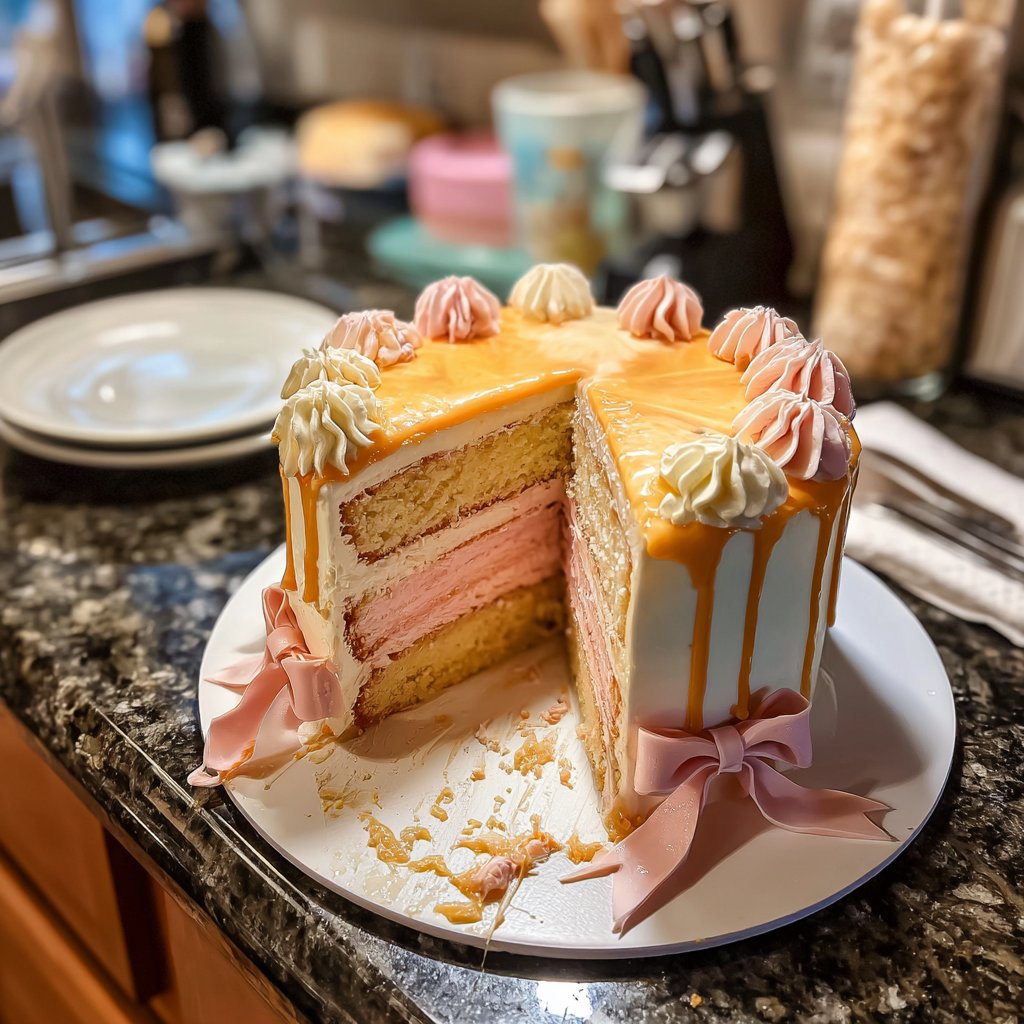
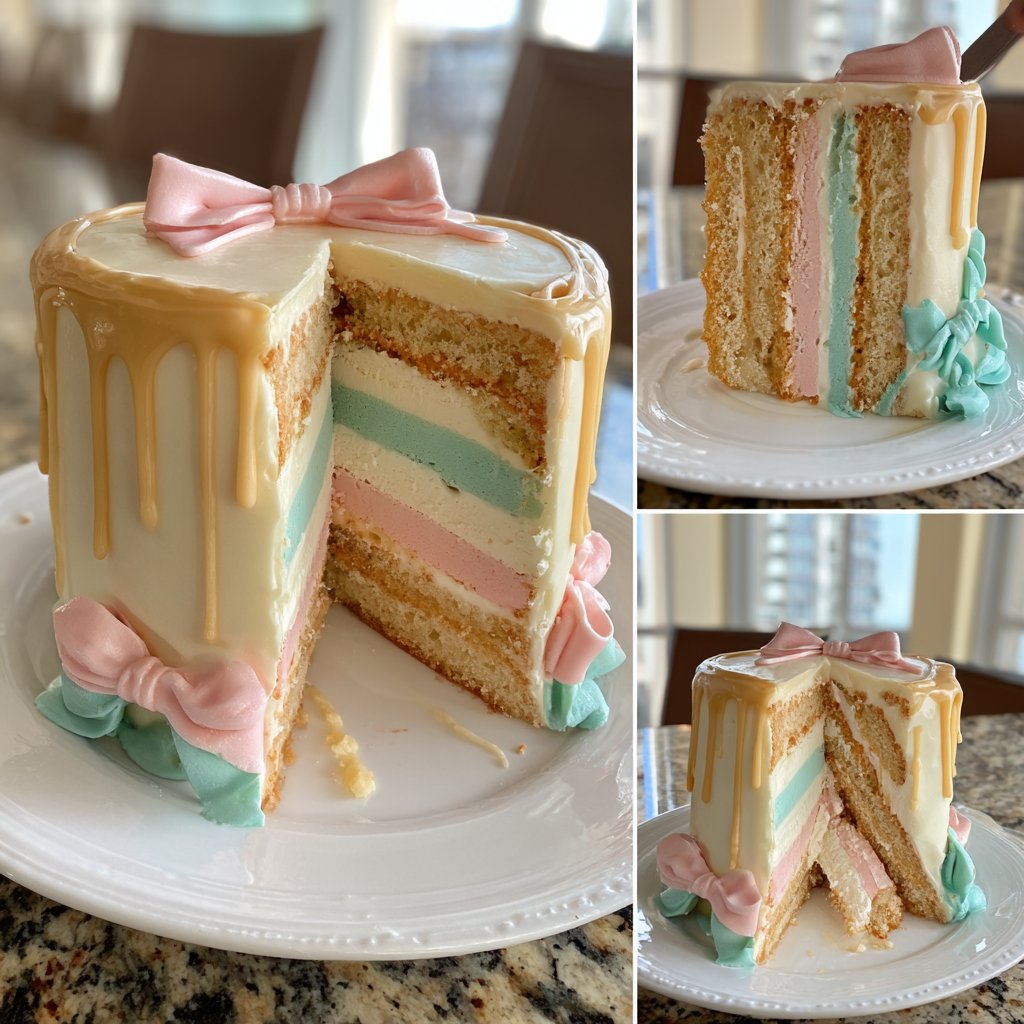
I’ve always been fascinated by the beauty of layered cakes, and this Ombre Birthday Cake with Bows is no exception. The way the colors blend from light to dark creates a stunning visual presentation that is perfect for any celebration. Each slice reveals a beautiful gradient that not only looks appealing but also tantalizes the taste buds with its vanilla and buttercream flavors. As I crafted this cake, I discovered that the secret to a smooth frosting lies in warming the butter and mixing it until it’s light and fluffy. This cake is sure to be a showstopper at your next gathering!
When I first made this Ombre Birthday Cake, I wanted to create something that wasn’t just delicious but also visually striking. The ombre effect fascinated me, and I experimented with different shades of frosting. I learned that the perfect balance of color can take your cake from ordinary to extraordinary. Using gel food colors instead of liquid made it much easier and more consistent!
As I frosted the layers, I found that a rotating cake stand was a game-changer. It allowed me to apply the frosting smoothly while keeping the layers aligned. Plus, adding bows made from fondant not only enhanced its appearance but also added an elegant touch that my guests adored. This cake truly turned out to be the piece de resistance of my celebration!
Why You Will Love This Cake
- Stunning ombre effect that impresses guests
- Deliciously smooth and creamy buttercream frosting
- Perfect for birthdays, parties, or any celebration
The Importance of Cake Batter Consistency
Achieving the right consistency in your cake batter is crucial for a successful ombre birthday cake. After mixing the dry ingredients and creaming the butter and sugar, the batter should be thick yet pourable. If it's too dry, the cake layers will be dense and dry. Conversely, if it's too runny, the layers may not rise properly. Aim for a batter that falls off the whisk in a thick ribbon, ensuring a fluffy, layered finished cake.
One key to avoid any lumps and to achieve that perfect batter texture is to sift the dry ingredients before mixing. This helps aerate your flour and eliminates any clumps of baking powder or salt. I also recommend using room temperature eggs and milk, as these blend more easily into the batter, promoting an even texture and rich taste.
Mastering the Ombre Frosting Technique
The ombre frosting is the star of this cake, and mastering it elevates its presentation. To get a smooth gradient effect, ensure you have the right tools: a bench scraper and an offset spatula are your best friends. Start at the base of your cake and apply the darkest shade of frosting, gradually adding lighter tones as you work upward. Take your time during this step; it requires patience to achieve a seamless transition in color.
A common issue when frosting is the risk of mixing colors unintentionally. To prevent this, clean your offset spatula between color applications. Additionally, using a turntable can enhance your ability to work the frosting evenly around the cake, ensuring that each section blends beautifully. If you encounter any rough spots, simply smooth them out with a gentle touch of the spatula, and remember that practice will make you more skilled over time.
Storing and Serving Your Cake
Once your ombre birthday cake is frosted and decorated, proper storage is essential to maintain freshness. Keep the cake in an airtight container at room temperature for up to three days, or refrigerate it if your environment is particularly warm. If you need to make it ahead of time, the unfrosted cake layers can be wrapped tightly in plastic wrap and frozen for up to two months. Just allow them to thaw completely at room temperature before frosting.
For serving, consider pairing this cake with a simple vanilla ice cream or a fresh fruit compote to balance its rich flavors. If you have leftover cake, the individual layers can also be repurposed as cake pops when crumbled and mixed with buttercream. Not only is this a fun project, but it allows for creative variations on flavors and frostings that might suit your palate or event theme.
Ingredients
Gather the following ingredients to create your Ombre Birthday Cake:
Cake Ingredients
- 2 3/4 cups all-purpose flour
- 2 1/2 tsp baking powder
- 1/2 tsp salt
- 1 cup unsalted butter, softened
- 2 cups sugar
- 4 large eggs
- 2 tsp vanilla extract
- 1 cup milk
Buttercream Frosting Ingredients
- 2 cups unsalted butter, softened
- 6 cups powdered sugar
- 1/4 cup milk
- 1 tsp vanilla extract
- Gel food colors (various shades)
- Fondant for bows (optional)
Ensure you have everything ready before starting your baking!
Instructions
Follow these steps to create your Ombre Birthday Cake:
Prepare the Cake Batter
Preheat your oven to 350°F (175°C). In a bowl, mix flour, baking powder, and salt. In another bowl, cream butter and sugar until light and fluffy. Add eggs one at a time, then stir in vanilla. Gradually mix in the dry ingredients, alternating with milk.
Bake the Layers
Divide the batter into three bowls. Color each bowl with different shades of food coloring, moving from light to dark. Pour each colored batter into separate 9-inch round cake pans and bake for 25-30 minutes. Allow to cool completely.
Prepare the Buttercream Frosting
In a large bowl, beat the softened butter until creamy. Gradually add powdered sugar, milk, and vanilla, beating until smooth and fluffy. Divide into three bowls and color with food dye to match the cake layers.
Assemble the Cake
Place the darkest layer on a cake stand, spread frosting on top, then add the medium layer. Repeat for the lightest layer. Crumb coat the entire cake and chill for 30 minutes.
Frost with Ombre Technique
Starting with the darkest frosting, ice the bottom of the cake, gradually lightening the color as you move up. Smooth the frosting for an ombre effect. Decorate with fondant bows if desired.
Allow the cake to set for a bit before slicing!
Pro Tips
- For best results, let your butter and eggs come to room temperature before starting the cake. This will help create a smoother batter. If you find the frosting difficult to spread, add a bit more milk to get the desired consistency.
Ingredient Substitutions
If you’re looking for a way to make this ombre cake a bit lighter, you can substitute some of the all-purpose flour with cake flour. Cake flour has a lower protein content, which can result in a softer crumb – perfect for those who prefer a light, airy texture. Just note that using cake flour may slightly alter the cake’s overall structure, so you might want to experiment with the ratios for best results.
For a dairy-free version, opt for plant-based butter and non-dairy milk (like almond or coconut). You can also replace the powdered sugar in the frosting with powdered coconut sugar or a homemade version using a food processor, blending sugar until finely powdered.
Troubleshooting Common Issues
Sometimes, your cake layers may not rise as expected. This can be due to expired baking powder or not mixing the batter thoroughly. Ensure your baking powder is fresh, and mix until the batter is just combined without over-mixing, which can lead to tough cake layers. If you find some layers are uneven, leveling them with a serrated knife after baking will help ensure each slice is visually appealing.
When it comes to the frosting, a common problem is having it turn out too soft, which can make it difficult to achieve that clean ombre effect. If your buttercream is too soft, try chilling it in the refrigerator for 15-20 minutes. This will help firm it up without compromising its texture. Remember to return it to a spreadable consistency before you start frosting your cake!
Questions About Recipes
→ Can I use chocolate cake instead of vanilla?
Absolutely! Just substitute the vanilla flavor with cocoa powder to get a delicious chocolate ombre cake.
→ How long can I store the cake?
The cake can be stored in an airtight container at room temperature for up to three days or refrigerated for a week.
→ What is the best way to color the frosting?
Using gel food coloring ensures vibrant and rich colors. It also requires less liquid, keeping the frosting's consistency intact.
→ Can I make the cake ahead of time?
Yes, you can bake the layers a day in advance and store them wrapped in plastic wrap until you're ready to assemble the cake.
Ombre Birthday Cake with Bows
Created by: The Whiskwonderfood Team
Recipe Type: Creative Sweet Recipe Ideas
Skill Level: Intermediate
Final Quantity: 12 servings
What You'll Need
Cake Ingredients
- 2 3/4 cups all-purpose flour
- 2 1/2 tsp baking powder
- 1/2 tsp salt
- 1 cup unsalted butter, softened
- 2 cups sugar
- 4 large eggs
- 2 tsp vanilla extract
- 1 cup milk
Buttercream Frosting Ingredients
- 2 cups unsalted butter, softened
- 6 cups powdered sugar
- 1/4 cup milk
- 1 tsp vanilla extract
- Gel food colors (various shades)
- Fondant for bows (optional)
How-To Steps
Preheat your oven to 350°F (175°C). In a bowl, mix flour, baking powder, and salt. In another bowl, cream butter and sugar until light and fluffy. Add eggs one at a time, then stir in vanilla. Gradually mix in the dry ingredients, alternating with milk.
Divide the batter into three bowls. Color each bowl with different shades of food coloring, moving from light to dark. Pour each colored batter into separate 9-inch round cake pans and bake for 25-30 minutes. Allow to cool completely.
In a large bowl, beat the softened butter until creamy. Gradually add powdered sugar, milk, and vanilla, beating until smooth and fluffy. Divide into three bowls and color with food dye to match the cake layers.
Place the darkest layer on a cake stand, spread frosting on top, then add the medium layer. Repeat for the lightest layer. Crumb coat the entire cake and chill for 30 minutes.
Starting with the darkest frosting, ice the bottom of the cake, gradually lightening the color as you move up. Smooth the frosting for an ombre effect. Decorate with fondant bows if desired.
Extra Tips
- For best results, let your butter and eggs come to room temperature before starting the cake. This will help create a smoother batter. If you find the frosting difficult to spread, add a bit more milk to get the desired consistency.
Nutritional Breakdown (Per Serving)
- Calories: 350 kcal
- Total Fat: 18g
- Saturated Fat: 11g
- Cholesterol: 65mg
- Sodium: 180mg
- Total Carbohydrates: 43g
- Dietary Fiber: 0g
- Sugars: 30g
- Protein: 3g